
Backup to USB, Create Acronis Bootable Media, Restore with Acronis Universal Restore
Step-by-step instructions on how to:
Back up the whole hard disk drive to an external USB Hard drive;
Create Acronis Bootable Media;
Restore the backup from external USB Hard drive using Acronis Universal Restore.
Applies to:
* Acronis True Image Echo Server for Windows with Acronis Universal Restore
* Acronis True Image Echo Enterprise Server with Acronis Universal Restore
* Acronis True Image Echo Workstation with Acronis Universal Restore
* Acronis True Image for Microsoft Windows Small Business Server with Acronis Universal Restore
(!) Acronis Universal Restore is a separate add-on.
(!) Acronis True Image Home does not support Acronis Universal Restore.
This document contains step-by-step instructions on how to migrate your system to a machine with dissimilar hardware.
The entire migration process described here consists of the following steps:
1. Backing up your system partition to a USB hard drive;
2. Creating Acronis Bootable Rescue Media with Acronis Universal Restore;
3. Restoring the backup to a machine with dissimilar hardware.
Step 1: Backing up your system partition to a USB hard drive
1. Run Acronis True Image Echo;
2. In the main window of the program click Backup to start the Create Backup Wizard:
3. On the welcome screen click Next:
4. Click My Computer to create a backup of the whole hard disk drive or the system partition, including all the data and partition structure:
5. On the Partitions Selection screen select the partitions or the whole hard disk drive you want to back up:
(!) If you are not going to back up the whole hard disk drive, make sure you back up the system partition.
6. On the Source Files Exclusion screen you can exclude files from the backup archive:
7. On the Backup Archive Location screen select your external USB hard disk drive:
8. On the Select Backup Mode choose Create a new full backup archive:
9. On the Choose Backup Options screen select to go with the default options or set the options manually:
10. On the Archive Comments screen put any information about the backup that you might find useful:
11. On the final screen check the summary of the planned operation and click Proceed to start the backup:
12. After you click Proceed the backup process will start:
13. After the backup process completes successfully you will the notification:
Step 2: Creating Acronis Bootable Rescue Media with Acronis Universal Restore
Please make sure that you have Acronis Universal Restore installed on the same machine with Acronis True Image Echo. If it is installed, in the title of the product you will see Acronis True Image Echo [Edition] with Acronis Universal Restore.
1. On the right pane of main window of the program click Create Bootable Resue Media:
2. On the welcome screen of Acronis Media Builder click Next:
3. On the Rescue Media Contents Selection check Acronis True Image Echo [Edition] with Acronis Universal Restore (full version):
4. On the Bootable Media Selection screen choose your CD burner and insert a blank CD:
You can also select ISO Image if you wish to burn the ISO to a CD later or use it to boot your Virtual Machine.
5. On the final screen click Proceed to create Acronis Bootable Rescue CD:
Step 3: Restoring the backup to a machine with dissimilar hardware
Before restoring the backup of your machine to a machine with dissimilar hardware, please make sure you have drivers for the hard disk drive controller or chipset drivers. These drivers are critical for booting the operating system.
You can download the drivers for your motherboard on the Vendora^€™s web-site. Please note, if you downloaded the drivers in *.exe, *.cab, *.zip format, you should extract them first.
The driver files should have *.inf, *.sys or *.oem extension.
1. Boot the machine to which you are going to restore the backup from Acronis Bootable Rescue CD. (Remember to set the primary boot device to CD-ROM in BIOS to make the machine boot from the CD).
2. Once booted, select Recovery:
3. On the welcome screen of the Restore Data Wizard click Next:
4. On the Backup Archive Selection screen choose the backup archive with system partition that you intend to recover:
5. On the Restoration Type Selection screen choose Restore disks or partitions:
6. On the Partition or Disk to Restore screen select the partitions you want to restore:
The recommendation is to select partition by partition, not the whole disk to recover. In this case you will get the possibility to resize the target partition size. In most cases it is not necessary to restore MBR.
7. On the Restored Partition Location select the target partition or unallocated space to which the backup will be restored:
8. On the Restored Partition Type set the type Active for your system partition:
If you do not set the type Active for your system partition, the machine will not boot.
9. If you selected to restore only one partition instead of the whole hard disk drive, you will see the Restored Partition Size window that will let you set the size for the restored partition:
10. On the Next Selection screen choose No, I do not if you are not going to restore other partitions at this time:
11. On the Acronis Universal Restore screen select Use Acronis Universal Restore:
12. On the Specifying Mass Storage Drivers screen click Add to specify drivers:
The recommendation is to specify the drivers manually. Hardware Vendors usually provide separate drivers for SCSI or RAID controllers. IDE or SATA drivers are usually included into the chipset drivers for the motherboard.
The HDD controller drivers are critical for booting the operating system. Specifying drivers for other devices (video/sound card) is not recommended. Once you restore and boot the system, you can update all other drivers manually in Windows Device Manager (Start -> Run -> devmgmt.msc).
13. On the Select File screen point to the exact driver file for the HDD controller:
14. Select the driver that will be used:
15. On the Restoration Options screen you can check both options: Search removable media for device drivers and Search device drivers in the following locations:
Acronis Universal Restore will search the checked options if some drivers are missing.
16. In Additional settings you can also check Change SID after the restoration is finished:
If this option is enabled, the SID will be automatically changed after the restore.
17. On the final screen you can check the summary and click Proceed:
18. The restore process will start:
If after the restore the machine does not boot correctly, please boot in Safe Mode (hit F8) and check the drivers in Windows Device Manager.
Tampilkan postingan dengan label System Tools. Tampilkan semua postingan
Tampilkan postingan dengan label System Tools. Tampilkan semua postingan
Sabtu, 07 April 2012
Macrium Reflect ReDeploy : Alternatif Membuat Image Kloning Ghost Universal
ReDeploy a system to new hardware
ReDeploy modifies an existing operating system to work on new hardware or on a virtual machine (VM).
To redeploy an image
- Boot the target PC or virtual machine with the Windows PE rescue CD.
- Restore the image file to the target disk. See Rescue a system with the Windows PE environment.
- When the restore is complete, on the restore tab in Macrium Reflect in Windows PE, click ReDeploy Restored Image to new hardware or select the ReDeploy To New Hardware option on the Restore menu.
- The ReDeploy screen appears. Macrium ReDeploy searches the computer for operating systems. If you have more than one operating system installed then you are presented with a list of operating systems. Please note that server class operating systems will not be supported on the non server version of Macrium ReFlect.

- Select the required operating system and click Next.
The Driver File Locations screen appears.
- Specify driver locations for your mass storage devices (such as RAID card) and insert a driver disk for the hardware you are going to boot from. This is typically the motherboard or RAID card driver CD. Also specify additional paths such as network folders.
- Click Next.
ReDeploy searches through the driver locations you specified. If you did not specify any locations, or no matching drivers are found, then ReDeploy searches removable devices such as CDs and floppy drives. Finally, ReDeploy searches through the Windows driver database.
The Detected Devices screen appears with a list of drivers.
- Click on each device to view details of the device and drivers.
- Click Next.
- For each mass storage device, there are three possibilities:
- The driver is already installed although it might still need to be enabled at boot. ReDeploy will enables the driver when you click finish.
- The driver has been located, either from a CD, a user specified path, or from the Windows database. ReDeploy will install the driver when you click finish.
- No matching driver has been located.
- If no driver has been located or to override the displayed driver, click Locate Driver and manually specify an .inf file.
 Note: If you have several mass storage interfaces in your system, then you only need to locate drivers for the hardware that contains the windows system and active partitions.The Additional Options screen appears.
- Initially, leave the options on this page at their default values. If you have trouble booting the operating system on the new hardware, then you can use these options later to help resolve issues. The options are as follows:
OptionDescriptionDisable reboot on system stopSet this option to prevent automatic rebooting when a Windows system stop and blue screen occur while Windows is loading or running. Without this this option blue screen displays for too little time for you to note the error codes.Display boot drivers as they loadSet this option to show which drivers are loading as Windows loads. When Windows loads and runs without issue, switch off this option using the Windows MSCONFIG utility. Use the Pause/Break key to freeze the list as it scrolls past, use space to continue.Enable boot loggingSet this option to make Windows log drivers as they load. Windows places the log file, ntblog.txt, in the Windows folder. When Windows loads and runs without issue, switch off this option using the Windows MSCONFIG utility.Disable CPU DriverSet this option to disable CPU drivers. This may be useful if you see blue screens caused by the selected Hardware Abstraction Layer drivers or experience a system lockup when starting standby or shutdown.Set Hardware Abstraction LayerSet this option to choose which Hardware Abstraction Layer (HAL) Windows uses. ReDeploy initially selects the recommended HAL for this machine. However, if you have the incorrect HAL configured, your Windows installation is typically unstable and produces blue screens and lock ups after Windows has booted. In particular, if you are redeploying from or to Virtual Box with APIC unchecked (the default) or very old physical hardware, the you need to set a new HAL.Allow Windows to detect Hardware Abstraction LayerSet this option to allow Windows to determine the best Hardware Abstraction Layer to use at boot time. For Vista, use this in preference to the Set Hardware Abstraction Layer option. This option only works for Windows Vista and later Windows operating systems.Enable SATA AHCISet this option to enable support for generic SATA AHCI hardware. You will typically also need to enable an option in your BIOS for your mass storage hardware to operate in this mode. This option only works for Windows Vista and later Windows operating systems. - Click Next
A Confirmation screen presented a list of actions.
- Click Finish to apply these options to the target operating system.
After a restart the operating system should be compatible with the new client computer.Note: A log file ReDeploy.log is saved to the drive containing the redeployed operating system.
Minggu, 24 Juli 2011
Download Google Android Emulator
Dalam situasi menunggu Bluestack (konon sesumbarnya bisa berdampingan baik dengan windows sehingga bisa menjalankan aplikasi android dengan lancar dalam lingkungan windows) bisa didownload dan dicoba, saya tetap berusaha mencari emulator Android yang mudah diinstall dan tanpa ribet menjalankannya. Akhirnya menemukan juga file yang dimaksud. Emulator ini mudah digunakan dan lumayan cepat.
Do you want to test drive Google Android without having to buy a phone? Google SDK package allows developers to see all android features and let them use the whole interface.
If you don’t want to be bothered by the complex Google SDK Package, then RedmondPie reports that Haseeb a member at XDA-Developers forum has managed to create an executable file by packaging and configuring the Google SDK. Which means that you can now use the complete emulator in a single-click without having to install Google SDK package.
All you have to do is extract the .rar archive, rename extracted folder to “Android-Emulator”, Download and Copy fixed exe files in it, and then finally run it. These steps are rather complicated and confusing. So instead of following these steps, I have provided the direct link to download Android Emulator, just extract the zip archive and run the executable file. That’s it.


Download Android Emulator 1.5 for Windows (57 MB Hosted on AddictiveTips)
Enjoy!
XDA-Developers forum member xda2_haseeb has managed to extract and run AndroidEmulator on Windows which comes as a part of Google Android SDK package. For those of you who want to take Android on a ride for general OS look and feel can use this standalone Android Emulator which is patched to run on a Windows PC as a standalone app without having to download and install the complete Android SDK.


Installation instructions for standalone Android Emulator on Windows
1. Download Android Emulator v1.5 for Windows.
2. Extract the contents of the .rar file.
3. Now rename the extracted folder to "Android-Emulator".
4. Download the patched executable files from here.
5. Copy/Paste these patched files into the newly named “Android-Emulator” folder.
That’s it! You can now test and run the complete emulated mobile Android OS on your computer without having to download and install the SDK. You can even install Android compatible apps on it. Check out this link for more on installing apps and moving files on and off the phone. I have tested it on Windows 7 x64 and it works flawlessly on it. Now if only someone could come up with a way to install HTC Hero’s Sense UI on it!
Download Android Emulator 1.5 for Windows
Senin, 18 Juli 2011
Portable Ultima Steganography 1.5 : Menyimpan Data Dibalik Gambar

Ultima Steganography is an extremely easy-to-use steganography software for Windows. With the help of the program you can easily encrypt some file and hide it in a picture. Once a file is hidden in an image the saved picture is still a picture, it will load just like any other image and appear as it did before, the only difference will be that it contains hidden file.
http://www.filesonic.com/file/326506704/X-15US.rar
Portable FACES EDU PLUS v4.0.3.0
This program used by the FBI to identify suspects allows you to create, modify various faces.
FACES 4.0 EDU is a classroom version of the award-winning software that allows police investigators to develop accurate, photo-like suspect composites.Intuitive and easy to use, FACES 4.0 EDU lets students create billions of different human faces with point-and-click selection from its rich database of facial features.
Key features:
FACES technology is used by thousands of police agencies worldwide – including the FBI and CIA – to identify, track and apprehend criminal suspects.
FACES 4.0 EDU is an ideal support for criminology and forensic classes, giving students hands-on experience in how suspect composites – like DNA, fingerprint and other evidence – are used to solve crimes. Students can use FACES 4.0 EDU to carry out simulated witness interviews, develop facial composites, and even create virtual line-ups.
For younger children, FACES 4.0 EDU can be used to teach observational skills that can be critical in increasing personal awareness and safety. FACES 4.0 EDU also has creative applications, such as enhancing drama and reading appreciation by allowing students to develop images of historic or fictional characters.
FACES 4.0 EDU images can be exported as JPEGs and used to further build skills in computer graphics programs such as Photoshop. Available in English, French and Spanish, FACES 4.0 EDU can even provide a unique approach to second language classes, encouraging students to learn vocabulary to describe and identify facial features.
FACES 4.0 EDU Advanced Features
• Creates billions of photo quality facial composites with a click of a mouse
• Database of 2000 facial features includes Asian, Latino andAfrican-American components
• Compatible with latest MAC 0S and Windows NT operating systems and available in stand alone or network versions
• Composites can be exported as JPEG files to use in graphics programs such as Photoshop
• Light, medium and dark hair tones and facial markings such as scars, moles, piercings and tattoos
• Positioning and zooming tools, and age progression features to refine composites
• Slide show to provide a “virtual lineup”: FACES game five different levels to build observation and composite skills
http://www.filesonic.com/file/1269932074/T-4030IQBF.rar
Portable HTMLRunExe v2.7.1.25 : Membuat eBook exe dari HTML

The HTMLRunExe is a specialized software to create digital books (e-books). The exhibition is made as in a common browser, with the advantage of being edited by the user, because you can modify various settings of this title to your presentation.
This way you can turn your HTML pages in digital e-books, and use all the resources of webdesign, because there is no restriction some, such as applets, javascript, cascading styles, animated images in GIF, Flash animations. All you can do in a browser is allowed in HTMRunExe. In addition he has a unique tool for creating menus, which increases the interactivity and design of your project. You also have the option of putting skins, giving a more professional style to your project.
You can publish your project in two types of compilation in conventional mode, where the project files are out of the executable, and the option to Embed all the executable files so that all files are in a single file.
You can publish your project in two types of compilation in conventional mode, where the project files are out of the executable, and the option to Embed all the executable files so that all files are in a single file.
http://www.filesonic.com/file/1366602264/T-27125HRE.rar
FlashBoot v2.1c Full Version

Description:
FlashBoot is a tool to make USB disks bootable. Its primary focus are USB Flash disks, but other types of USB devices are supported as well. Making disk bootable involves formatting and copying operating system files to it. Different operating systems are supported: Windows 7/Vista, Windows XP, SysLinux-based disks, GRUB4DOS disks, Linux kernel etc.
You may create blank bootable USB flash with minimal set of system files and then manually tune it for your needs, or convert a full-featured bootable CD-ROM or floppy disk to bootable USB Flash keeping all functionality.
Most known and popular FlashBoot feature is a convertion of Windows XP/Vista/7 installation CD/DVD into bootable USB disk, useful for Windows installation on netbooks and other devices without CD/DVD drive.
System requirements for FlashBoot 2.x:
Setelah instal selesai, copy file license_key.xml di dalam folder Keyfile ke dalam direktory instalasi Flashboot.
Official web Flashboot
FlashBoot is a tool to make USB disks bootable. Its primary focus are USB Flash disks, but other types of USB devices are supported as well. Making disk bootable involves formatting and copying operating system files to it. Different operating systems are supported: Windows 7/Vista, Windows XP, SysLinux-based disks, GRUB4DOS disks, Linux kernel etc.
You may create blank bootable USB flash with minimal set of system files and then manually tune it for your needs, or convert a full-featured bootable CD-ROM or floppy disk to bootable USB Flash keeping all functionality.
Most known and popular FlashBoot feature is a convertion of Windows XP/Vista/7 installation CD/DVD into bootable USB disk, useful for Windows installation on netbooks and other devices without CD/DVD drive.
System requirements for FlashBoot 2.x:
- BIOS which supports booting from USB devices
- Operating system: Windows XP, Windows Vista, Windows 7, Windows Server 2003, Windows Server 2008, either x86 or x64 edition
- 256 Mbytes of RAM
- 30 Mbytes of disk space
Setelah instal selesai, copy file license_key.xml di dalam folder Keyfile ke dalam direktory instalasi Flashboot.
Official web Flashboot
DOWNLOAD
32MB | Dropbox
Password: gotechno.tk
Jumat, 15 Juli 2011
Almeza MultiSet Professional v7.9.2

Almeza MultiSet Professional v7.9.2 | 8.7 Mb
Almeza MultiSet - Leader in Unattended Installation of Windows and Software. Want to create a Windows installation disk or USB Flash Drive that will automatically install the OS Windows without asking questions about username, product key, time and locale settings? At the same time your favorite applications are automatically installed, the necessary keys are entered into the registry, drivers are updated, new patches (service packs) from Microsoft are installed. It's possible and you can do it easily with Almeza MultiSet.
Almeza MultiSet will automatically install all the applications you require, either onto your original computer or onto a new one. It's an ideal solution for rebuilding your systems quickly!
Create a bootable USB Flash Drive. You can use Almeza MultiSet Professional software to create a bootable USB Flash Drive for automatic installing Windows and software onto a computer.
Create a bootable automatic installation CD/DVD. You can use MultiSet software to create a universal disk for automatic installing software onto a computer using any media (CD/DVD/Flash/Hard Drive). Automatic Installation Anywhere!
Now you can install the programs in any location and as many times as you want - just insert the disk into the CDROM, DVDROM or FlashDrive, and MultiSet will undertake the complete installation procedure for you!
Do you want to automate installation of programs but have no time to learn how to write the necessary scripts? Do you prefer simple and convenient solutions? Do you want to see the results immediately? This is just the answer you have been looking for!
Supported OS: Windows 2000, XP, Vista, Server, 7
Home Page - http://www.almeza.com/
Sabtu, 05 Maret 2011
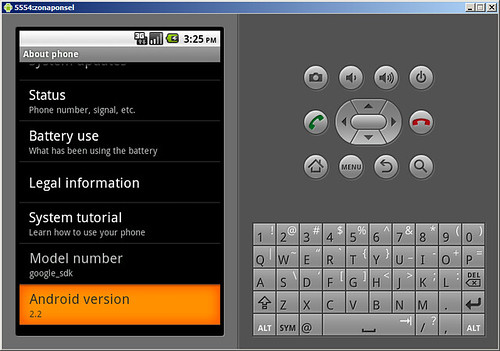
Tips Mencoba Android Froyo Menggunakan Android Emulator
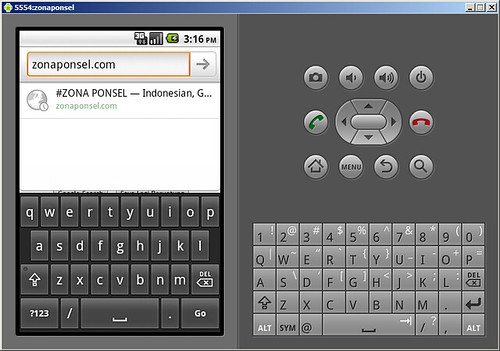
zonaponsel.com – Penasaran dengan Android Froyo ? Anda bisa mencicipi versi Android terbaru dari Google tersebut tanpa harus memiliki ponsel Android. Berikut tips mencoba Android Froyo menggunakan Google Android Emulator.
Selain untuk PC Windows, Android Emulator juga tersedia untuk Mac OS X (Intel) dan Linux. Pada tips berikut, kami menggunakan Microsoft Windows XP untuk menjalankan Android Emulator.
- Pastikan komputer memenuhi persyaratan system untuk menjalankan Android Emulator. Persyaratan system untuk Android Emulator dapat dilihat di sini.
- Install Java Development Kit (JDK) yang dapat di download di sini.
- Install Eclipse (Optional). Jika anda berencana untuk mengembangkan aplikasi menggunakan Android Development Tool (ADT) Plugin anda harus memasang Eclipse yang dapat di download di sini.
- Download Android SDK Starter Package dari alamat ini.
- Extract Android SDK Starter Package yang telah di download. Secara default Android SDK Starter Package akan di extract ke direktori android-sdk-windows
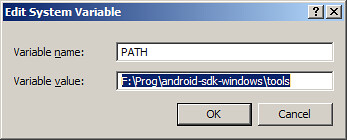
- Klik kanan My Computer kemudian pilih Properties. Pada System properties klikAdvanced kemudian Environment Variables. Pada System Variables klik New, isikanPATH pada Variable Name kemudian isikan lokasi direktori tools pada Variable Name. Sebagai contoh kami mengekstrak Android SDK pada direktori F:\Prog\android-sdk-windows, maka lokasi direktori tool adalah : F:\Prog\android-sdk-windows\tools
- Jalankan File SDK Setup.exe untuk membuka Android SDK and AVD Manager
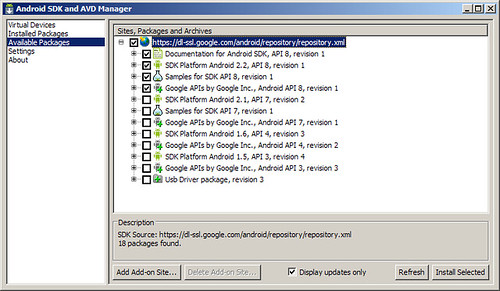
- Pada Android SDK and AVD Manager pilih Available Package, beri tanda centang seperti gambar di bawah kemudian Install Selected.
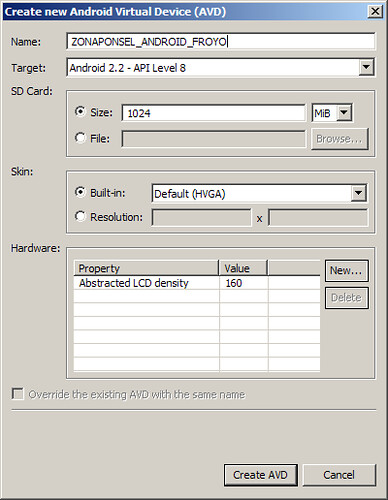
- Setelah proses download dan instalasi selesai, pilih Virtual Device kemudian klik New
- Pada bagian Name isikan nama virtual device anda, Target : Android 2.2 – API Level 8kemudian klik Create AVD.
- Klik Start untuk menjalankan Virtual Device yang telah anda buat sebelumnya. Happy Android :D
Langganan:
Postingan (Atom)


