Selasa, 15 Februari 2011

Imagine Image Animation Viewer : Penampil Gambar Terbaik dan Teringan

Imagine Image Animation Viewer : Penampil Gambar Terbaik dan Teringan

Dulu saya biasa menggunakan Irvanview, XNView atau ACDsee untuk melihat dan mengatur gambar. Namun sejak bertemu dengan Imagine, saya langsung terpikat dan pindah haluan. Ada beberapa hal yang membuat saya terpesona dari imagine, tampilan interfacenya yang simple dan komplit serta fiturnya yang lengkap adalah alasan utamanya. Alasan yang lain mungkin karena kecil dan cepatnya aplikasi ini dijalankan bahkan bisa berjalan stabil di window xp ramdisk 38 MB (WinPE Live CD).


Features

- View and save image/animation files with very fast speed
- Support for numerous image/animation file formats:
 GIF, BMP, PNG, JPG, TIF, TGA, PCX, ICO, ANI, FLI, and many more...
- Extract single/all frames from animation files
- Show detailed information of image/animation files
- Show EXIF information
- Show or hide transparency
- Support ZIP, RAR, 7Z, ALZ, HV3, CBZ, CBR, CB7 file
- 64-bit version available
- Unicode version available
- Multilingual support:
 English, German, Spanish, Russian, Danish, Korean, Chinese, and many more...
- Thumbnail browser
- Capture screen
- Batch conversion
- Slideshow
 - Save Slideshow as screensaver (scr) or Standalone Executable (exe).
- Tiled view (check textures for seamless tiling,
 very useful for game developers/modders)
- Create animations
- Create multiple page images
- Manipulate and edit images:
 + Flip vertical and horizontal
 + Rotate left, right and free
 + Grayscale
 + Negative
 + Change color depth (1, 4, 8, 16, 24 and 32 bit)
 + Swap colors
 + Resize per pixel, percentage or standard dimensions.
   Several resample filters available.
 + Effect filters, including a handy Preview browser
 + Import, export and edit palettes
 + Set and remove transparency
 + and more...
- Customizable shortcuts for Keyboard and Mouse
- Command line parameter support
- Shell extension support
- Add-on plugin support
- Total Commander lister and packer plugin
- No write unnecessary registry (ini-based configuration)
- Fully optimized binaries (tiny, pure, fast, neat)


System requirements:
~~~~~~~~~~~~~~~~~~~~
 - CPU: Pentium compatible
 - Memory: 32MB or higher
 - OS: Microsoft Windows 95/98/ME/NT 4.0/2000/XP/2003/Vista/7
 - Display: 256 color or higher

Download punyaku

Download

Membuat Image Norton Ghost Windows XP Universal : Kloning Untuk Semua PC

Membuat Image Norton Ghost Windows XP Universal : Kloning Untuk Semua PC

Beberapa minggu yang lalu saya kedatangan tamu spesial, yang mempunyai karakter dan hobby yang mirip dengan saya. Banyak hal yang saya dapatkan darinya, dari banyaknya pengalamannya, terutama soal koleksi cd, dvd dan downloadan. Karena hardisk saya sudah limit maka dari 500 hardisk portablenya, hanya beberapa GIGA yang sempat mampit ke netbook pink-ku, yakni file iso cd ghost-ghost an Windows XP universal yang bisa dikloningkan ke semua PC. 

Setelah mencobanya dikloningkan ke beberapa PC dan netbook, hasilnya cukup memuaskan, Windows langsung bisa bunyi dan tanpa kesulitan mengetik serial number dan masalah craking lainnya. Namun sayang beberapa aplikasi yang include berbahasa asing yang sangat asing (mungkin thai atau rusia). Karenanya alif mencoba mencari dokumen cara membuat image Ghost Universal sendiri, sehingga Windows kloningan menjadi yang saya inginkan (terutama Office, arabic support dan multimedia tentunya). Dengan Everything Searh Engine, bisa ditemukan dokumen itu ada pada folder downloadan saya dengan nama "05april2010", hampir setahun lalu saya menemukan caranya, hanya saja belum sempat dipraktekkan.

Ternyata analoginya, SPAT akan membuat Windows berkonfigurasi tertentu dan membuat skydriver atau Easydriver sebagai pendeteksi driver yang dibutuhkan dan menginstallnya otomatis saat pertama kali booting dari hasil ghost-ghost an (dan Windows induk pun terkena nasib yang sama, sehingga semua driver yang sudah diinstall akan dihapus dan dihilangkan otomatis oleh SPAT). Sehingga setelah ujicoba ini Windows pun saat di restart akan seperti ghost-ghost an, akan melakukan setup mini terhadap driver yang telah dihapus.

Ghost-ghost an Windows XP normal umumnya akan gagal dikloningkan pada komputer lain karena masalah hardware alias driver, nah dengan metode ini kita bisa memecahkan masalah tersebut. Kalaupun bisa, biasanya tidak setabil dan sering ngadat.

Untuk membuat image ghost universal sebetulnya caranya sangat mudah, kita hanya butuh dua aplikasi utama yaitu SPAT (System Preparation Assisted Tool) dan Skydriver atau easy driver dari sky123.org

Cara simpelnya :

1. Install atau buat (konfigurasikan) Windows XP anda sebaik mungkin dan selengkap mungkin seperti yang anda inginkan atau butuhkan. Dan hapus file yang tidak berguna. Untuk aplikasi driver tidak masalah diinstall atau belum.

2. Download dua aplikasi yang dimaksud. SPAT download di sini , dan Easydriver di sini .

3. Ekstrak SPAT dimana saja boleh, tapi untuk Easydriver harus di C:\Sysprep, buat folder "Sysprep" pada C:\ atau rename saja folder ekstrakan easydrivernya dengan "Sysprep".

4. Siapkan gambar background setup yang akan tampil pada saat image ghost pertama diboot dan sysprep melakukan installasi mini. Misal setup.jpg (bisa 800x600 atau 1024x768 24 bit format jpg). Taruh gambar itu pada folder C:\Sysprep.

5. Jika semua sudah siap, jalankan saja SPAT*.EXE. Kita menuju ke menu tab "General" dan pilihlah "select all". Klik pada "Background picture" dan pilih setup.jpg yang sudah disiapkan (C:\Sysprep\setup.jpg).

6. Masuklah pada tab "Interface" dan pilihlah "Run before mini-setup" dan pastikan menambahkan C:\Sysprep\Easydrv.exe (atau nama semisalnya dari Skydriver atau easydriver).

7. Masuklah ke tab "Reseal" dan pilihlah/centang hal-hal yang anda sukai.

8. Kembali ke tab "General" dan klik "sysprep".

9. Sysprep akan bekerja 2 - 5 menit, biarkan hingga berhenti sendiri dan window nya hilang sendiri. Setelah selesai tunggu sekira 1 menit, lalu Shutdownlah Windows anda. Siapkan booting dari CD atau USB yang ada Norton Ghost atau aplikasi kloning lainnya (saran saya Hiren'sbootcd atau BoloplekCD).

10. Pada saat itu posisi drive C:\ siap di kloning dan simpan hasilnya pada drive lain. Image ghost nya bisa dijadikan master windows semua pc dan laptop / netboot yang mendukung Windows.

Pada pengalaman saya, setelah ujicoba, Windows induk jadi tidak bisa standby dan hibernate dan tidak bisa shutdown otomatis, perlu mencet tombol power untuk mematikan Windows, tetapi mungkin itu hanya untuk kasus saya (saya belum install ulang driver-driver netbook bawaan). Maaf, Screen shoot belum bisa diunggah, maklum dari modem yang lebih lemot dari wifi sekolah.

Untuk Windows Vista dan 7, bisa menggunakan Easy Sysprep yang lebih handal, mendukung semua versi Windows. Selamat mencoba dan bahagia....(tidak ada alasan lagi untuk install windows berjam-jam).

Kamis, 03 Februari 2011

Everything Search v1.2.1.371 : Mencari file & folder Tercepat Sedunia

Everything Search v1.2.1.371 : Mencari file & folder Tercepat Sedunia


Dulu saya mengandalkan FileSeeker atau Efective File Search yang beberapa kali lebih cepat dan lebih mudah digunakan dari pada tool searching bawaan Windows. Ketika mencari image Ghost Windows Tiny 7 universal, tak sengaja mata saya tertuju pada Everything Search v1.2.1.371 (find files and folders without waiting), sontak saya tanya pada Mbah Gugel, dan sebentar kemudian mendapatkan website dan link downloadnya. Setelah mencoba versi portable, maka SUBHANALLOH, begitu cepatnya hasil pencarian yang dilakukan, hampir tidak ada waktu pencarian, karena kata apa yang saya ketik, maka daftar hasilnya langsung ada di bawahnya meski jumlahnya puluhan ribu.

Jika anda masih setia memakai Windows, maka ini adalah aplikasi wajib pertama yang saya sarankan untuk diinstall, karena ini adalah Google nya File Manager. Ratusan ribu file dan folder anda akan tersa seperti sepuluh jari tangan anda yang tidak bisa sembunyi dari lirikan mata kekasihmu.

Hingga kini  ada tiga aplikasi pencarian yang membuat saya kagum dtSearch, Marjaa' Akbar dan Everything Search, kesemuanya hampir mampu mencari tanpa waktu tunggu menampilkan hasilnya, meski jumlahnya ribuan. Terimas kasih bagi para pembuatnya.

Jika anda kurang puas dengan omongan saya, baca saja klaim dari pembuatnya di bawah ini :

1.1 What is "Everything"?

"Everything" is an administrative tool that locates files and folders by filename instantly for Windows.
Unlike Windows search "Everything" initially displays every file and folder on your computer (hence the name "Everything").
You type in a search filter to limit what files and folders are displayed.

1.2 How long will it take to index my files?

"Everything" only uses file and folder names and generally takes a few seconds to build its database.
A fresh install of Windows XP SP2 (about 20,000 files) will take about 1 second to index.
1,000,000 files will take about 1 minute.

1.3 Does Everything search file contents?

No, "Everything" does not search file contents, only file and folder names.

1.4 Does "Everything" hog my system resources?

No, "Everything" uses very little system resources.
A fresh install of Windows XP SP2 (about 20,000 files) will use about 3-5mb of ram and less than 1mb of disk space.
1,000,000 files will use about 45mb of ram and 5mb of disk space.

1.5 Does "Everything" monitor file system changes?

Yes, "Everything" does monitor file system changes.
Your search windows will reflect changes made to the file system.

1.6 Is "Everything" free?

Yes, "Everything" is Freeware.
If you use "Everything" in a commercial environment and find it useful a donation would be appreciated.

1.7 Does "Everything" miss changes made to the file system if it is not running?

No, "Everything" can be closed and restarted without missing changes made to the file system (even across system restarts).
"Everything" updates the database when it is started.

1.8 What are the system requirements for "Everything"?

"Everything" will run on Windows 2000, XP, 2003 and Vista and Windows 7
"Everything" will only locate files and folders on local NTFS volumes.
"Everything" requires administrative privileges for low level read access to volumes.

1.9 How do I convert a volume to NTFS?

1.10 Can "Everything" index a mapped network drive?

No, "Everything" only indexes local or removable NTFS volumes.

To search a networked computer you will need to run Everything on both computers.
One computer will need to Start an ETP server.
The other computer will need to connect to that ETP server.

To start an ETP server:
1. In Everything, On the Tools menu, click Start ETP server.

To connect to an ETP server:
1. In Everything, On the Tools menu, click Connect to ETP Server....
2. Type in the ETP server name.
3. Type in the ETP server port.
4. Type in the ETP server user.
5. Type in the ETP server password.
6. Click OK.

1.11 How do I install the language pack?

Download the language pack Everything.lng.zip
Unzip the language pack into the folder where "Everything" is installed.
Restart Everything.
In "Everything", On the Tools menu, click Options.
Click the General tab.
Select your language from the Language dropdown list.
Click OK.
In the "language change" popup, Click OK.
Restart Everything.

1.12 How do I bypass the UAC to run "Everything" with administrative privileges on system startup?

Disable run on system startup in "Everything".
Follow the Make Vista launch UAC restricted programs at startup with Task Scheduler guide at
http://blogs.techrepublic.com.com/window-on-windows/?p=616
Make sure you use -startup in the Add Arguments box

1.13 How do I bypass the UAC to run "Everything" with administrative privileges when I start it from a shortcut ?

2 Searching

2.1 How do I search for a file or folder?

Type the partial file or folder name into the search edit, the results will appear instantly.

2.2 How do I use boolean operators?

AND is the default boolean operator.
For example, here is how to search for foo and bar: foo bar
To search for either of two search terms, add a | between the terms.
For example, here is how to search for .jpg or .bmp: .jpg | .bmp
To exclude something from the search include a ! at the front of the term.
For example, here is how to search for abc and not 123: abc !123

2.3 How do I use wildcards?

Using a * in your search will match any number of any type of character.
For example, here is how to search for files and folders that start with e and end with g: e*g
Using a ? in your search will match one character.
For example, here is how to search for files that have a 2 letter file extension: *.??

2.4 How do I use regex?

|A vertical bar separates alternatives. For example, gray|grey can match "gray" or "grey".
()Parentheses are used to define the scope and precedence of the operators (among other uses). For example, gray|grey and gr(a|e)y are equivalent patterns which both describe the set of "gray" and "grey".
?The question mark indicates there is zero or one of the preceding element. For example,colou?r matches both "color" and "colour".
*The asterisk indicates there are zero or more of the preceding element. For example, ab*cmatches "ac", "abc", "abbc", "abbbc", and so on.
+The plus sign indicates that there is one or more of the preceding element. For example, ab+cmatches "abc", "abbc", "abbbc", and so on, but not "ac".
.Matches any single character except newlines (exactly which characters are considered newlines is flavor, character encoding, and platform specific, but it is safe to assume that the line feed character is included). Within POSIX bracket expressions, the dot character matches a literal dot. For example, a.c matches "abc", etc., but [a.c] matches only "a", ".", or "c".
[ ]A bracket expression. Matches a single character that is contained within the brackets. For example, [abc] matches "a", "b", or "c". [a-z] specifies a range which matches any lowercase letter from "a" to "z". These forms can be mixed: [abcx-z] matches "a", "b", "c", "x", "y", and "z", as does [a-cx-z]
[^ ]Matches a single character that is not contained within the brackets. For example, [^abc]matches any character other than "a", "b", or "c". [^a-z] matches any single character that is not a lowercase letter from "a" to "z". As above, literal characters and ranges can be mixed.
^Matches the starting position within the string. In line-based tools, it matches the starting position of any line.
$Matches the ending position of the string or the position just before a string-ending newline. In line-based tools, it matches the ending position of any line.
{m,n}Matches the preceding element at least m and not more than n times. For example, a{3,5}matches only "aaa", "aaaa", and "aaaaa". This is not found in a few, older instances of regular expressions.

2.5 How do I include spaces in my search?

To include spaces in your search enclose your search in double quotes.
For example, here is how to search for foobar: "foo bar"

2.6 How do I search for a file type?

To search for a file type, type the file extension into the search edit,
ie to search for the mp3 file type, type *.mp3 into the search edit.
To search for more than one type of file type use a | to separate file types,
ie *.bmp|*.jpg will search for files with the extension bmp or jpg.

2.7 How do I search for files and folders in a specific location?

To search for files and folders in a specific location include a \ in your search string.
For example, here is how to search for all your avis in a downloads folder: downloads\ .avi
You could alternately enable Match Path in the Search menu and include the location in your search string.
For example, here is how to search for all your avis in a downloads folder with Match Path enabled:downloads .avi

3 Results

3.1 How do I jump to a file or folder in the result list?

Make sure the result list has focus by tabbing to it with the keyboard or clicking in it with the mouse.
Type in the partial or full name of the file or folder you want to jump to.
For example, to jump to files or folders begining with "New" type New into the result list.

4 Customizing

4.1 How can I change the "Everything" icon?

Requires "Everything" 1.2.0 beta or later.
Copy your icon file into "Everything"'s installation folder and rename it to "Everything.ico".
Restart "Everything".

4.2 How can I set "Everything" to use an external file manager?

Requires "Everything" 1.2.0 beta or later.
Exit Everything.
Open Everything.ini in "Everything"'s installation folder.
Add the following 2 lines to the bottom of the ini:
open_folder_command=$exec("ExternalFileManager.exe" "%1")
open_folder_path_command=$exec("ExternalFileManager.exe" "$parent(%1)")
Replace the text ExternalFileManager.exe with the full path and file name of your file manager executable.
Check your external file manager help for any required command line parameters.
Restart "Everything".

5 Troubleshooting

5.1 Everything requests for administrator privileges in Windows Vista SP1

"Everything" requires administrator privileges because it needs raw read access to your hard drives.
Click accept to allow "Everything" to continue running.

5.2 The result list is empty

Make sure you have atleast one local NTFS volume.
See How do I convert a volume to NTFS.

Make sure "Everything" has administrator privileges.

To manually enable all local NTFS volumes for indexing:
1. In Everything, On the Tools menu, click Options.
2. Click the Volumes tab.
3. For each volume in the Local NTFS volumes list:
4. Check Check Media.
5. Check Enable USN Journal logging.
6. Check Include in database.
7. Check Monitor changes.
8. Repeat for each volume.
9. Click OK.

5.3 Right clicking on a file or folder crashes

Please replace your Everything.exe with the following beta to workaround the problem:
http://www.voidtools.com/Everything-1.2.1.375b.zip.
Download Everything for Windows 2000, XP, 2003, Vista, 2008 and Windows 7
Everything-1.2.1.371.zip (portable, 272 KB)
Download Everything Language Pack
Download Everything Command-line Interface
es.exe (53 KB)
es.zip (30 KB)
es-src.zip (6 KB)
Download Everything SDK

Selasa, 01 Februari 2011

Windows XP Mini LiveCD : 40 MB Bisa Ber XP ria

Windows XP Mini LiveCD : 40 MB Bisa Ber XP ria

Opera Portable bawaan Hirensbootcd sangat lancar

Note : file driver *.uha di folder HBCD bisa dihapus sehingga iso jadi 40 mb

Dari Hirensboot terbaru versi 13.0 yang menarik bagi saya sebetulnya adalah MiniXP nya yang konon mampu mengkoneksikan internet lewat driver modem wifinya. Dan itu membuat saya dengan sengaja mendownload 300an mb file rar berisi iso nya hiren cd, setelah hampir 3 jam membiarkan Google Chrome hidup di area wifi sekolah, akhirnya file windows minixp bisa saya pisahkan dari file aslinya yang 300an mb. 

40 mb file iso buatan Poweriso, ternyata bisa dicoba pakai grub4dos bootloader sehingga saya tidak susah-susah membakarnya pada cd, tapi cukup meletakkannya pada usb flashdisk dan dan membootnya via grub, meski saya sudah mencobanya terlebih dahulu via MobaliveCD turunan Qemu itu.

Setelah memncobanya booting lewat flashdisk, akhirnya saya harus memberi empat jempol pada pembuatnya karena meski kecil, tapi sangat setabil dan cepat, dan mampu menjalankan beberapa aplikasi penting, terutama yang ada pada cd hiren folder wintools (hampir seratus aplikasi, termasuk Opera browser, IrfanVier, Ghost, Notepad2, Foxit PDF Reader dan lainnya).

Ini beberapa screenshoot hasil jepretan irfanview langsung dari MiniXP :

Melihat pdf dengan Foxit Reader

Melihat sedikit sekali proses yang aktif

Flash dengan format exe sangat lancar dipelototi

eBook yang terbuat dari Web2exe bisa dijalankan dengan sempurna


Coba buka file dejavu dengan Lizartech portable
SARDU (Shardana Antivirus Rescue Disk Utility) : Mudahnya Buat DVD Multiboot

SARDU (Shardana Antivirus Rescue Disk Utility) : Mudahnya Buat DVD Multiboot

Posted Image

Posted Image


SARDU (singkatan dari Shardana Antivirus Rescue Disk Utility) adalah aplikasi software gratis yang dapat menghasilkan CD / DVD atau perangkat USB dengan dukungan multi-boot. Masih teringat betapa sulitnya kala tahun 2004 membuat BoloplekCD Multibootable

CD / DVD atau perangkat USB dapat mencakup koleksi lengkap cd penyelamatan antivirus, koleksi utilitas, distribusi populer dari Linux Live, dan Windows paling dikenal PE © dan disk pemulihan.

SARDU tidak termasuk beberapa utilitas, tetapi terutama alat untuk mengelola perangkat lunak (ISO file) Anda download dari perusahaan lain dan pengembang.

Download ISO harus ditempatkan di dalam folder iso. Atau, Anda dapat memilih jalan yang berbeda dengan memilih ikon iso di bagian atas GUI.

SARDU memiliki dukungan multilanguage. Saat startup itu memeriksa apakah sistem bahasa ada, kemudian menetapkan bahasa perangkat lunak yang sesuai. Jika bahasa sistem tidak ada bahasa diatur ke bahasa Inggris. (Penulis bersedia untuk menambahkan semua terjemahan mungkin). Pengguna dapat mengubah bahasa setiap saat menggunakan menu bahasa.

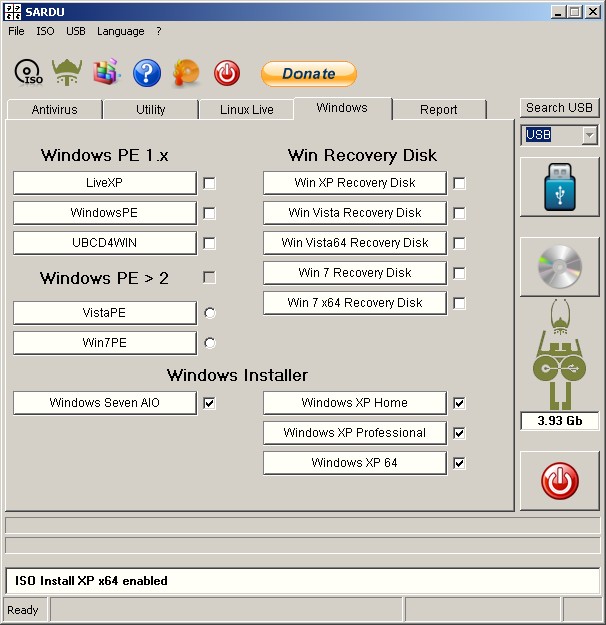
menu SARDU adalah dibagi menjadi empat kategori: Antivirus, Utilities, Linux, dan PE, dengan tombol dan kotak centang perangkat lunak individu.

Jika kotak centang yang dinonaktifkan (grey) ISO perangkat lunak yang tidak ditemukan. Menekan tombol dengan sebuah nama aplikasi menyebabkan SARDU untuk men-download ISO bootable dari situs web produsen dan membuatnya siap untuk digunakan (kotak centang dicentang). Download dapat dilakukan secara manual dengan menonaktifkan fungsi "File -> download Aktifkan langsung". Anda dapat memperbarui status dari folder iso dari File -> Refresh ISO / IMA menu atau dengan menekan F5. (NB: Anda tidak dapat mengubah nama default program individu karena mereka tidak akan diakui oleh perangkat lunak.)

Jika kotak centang yang tidak dicentang (putih) ISO tunggal dinonaktifkan dan tidak-aktif (nama file diubah dengan menghapus karakter terakhir dari ekstensi file).

SARDU sangat mudah digunakan. Dengan beberapa klik media siap. Jika Anda ingin membuat boot multi-USB Anda harus menekan tombol "Cari USB" tombol. Perangkat lunak kemudian akan mencari semua perangkat dengan FAT32. Perangkat dapat dipilih dari kotak kombo. Secara default kotak combo perangkat tidak aktif, dan diaktifkan hanya ketika satu (atau lebih) perangkat dengan FAT32 terdeteksi. Dalam tab 'Laporan' Anda dapat menemukan rincian tentang USB yang dipilih: Ketik (Removable atau Hard Disk), Serial, Label, Space digunakan dan gratis.

Menekan tombol dengan ikon USB menyebabkan SARDU untuk mengekstrak file yang dibutuhkan dari satu ISO pada suatu waktu.Setelah pemeriksaan hati-hati itu membangun dan membuat menu multi-boot perangkat USB.

Jika Anda ingin membuat CD atau DVD multibootable Anda harus menekan tombol dengan `disk`. SARDU kemudian ekstrak file yang dibutuhkan satu ISO pada waktu dan, setelah pemeriksaan hati-hati, membangun menu dan membuat ISO multibootable. ISO kemudian harus dibakar ke disk menggunakan perangkat lunak sendiri atau pembakar anda membakar pilihan SARDU

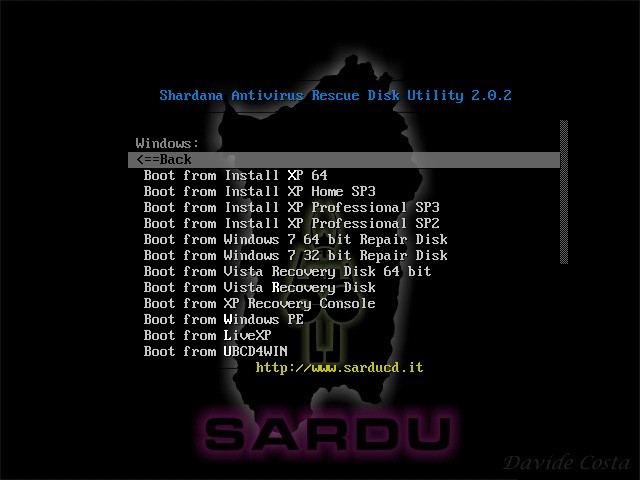
Untuk utilitas multiboot, SARDU (secara default) menggunakansyslinux / isolinux . Jika perlu, SARDU bukannya dapat menggunakan Grub4DOS dan BCDW . Penentuan yang digunakan dilakukan secara otomatis, tanpa masukan user yang diperlukan.

Banyak pengguna meminta saya menambahkan kemampuan untuk memanggil menu mereka sendiri atau menyertakan perangkat lunak yang berdiri sendiri. Di dalam folder ISO saya telah menyertakan sebuah `ekstra` folder dimana file tambahan bisa dimasukkan. Anda dapat mengaktifkan folder ini jika tidak ada dengan menekan File - Extra> Aktif. Pilihan ini untuk pengguna tingkat lanjut, dan aku tidak memberikan dukungan pelanggan berkaitan dengan penggunaannya.

Anda dapat menggunakan MobaLiveCD . untuk menguji Anda ISO selesai atau USB.